Rémon Verkerk, April 15, 2019
From the terminology “data recovery” you can already conclude that deleted files are not always permanently disappeared from a storage medium. Often files are only labeled by the operating system as data that can be overwritten. With the right tools, you can get back these supposedly deleted files.

“Is retrieving files yourself a smart way to save money?”
Retrieving files yourself is never recommended. Your own attempt at data recovery can only aggravate the damage, and data recovery is often no longer possible at all. Under certain circumstances it is indeed possible to retrieve files safely with the right recovery software. If you want to know more about the basic techniques of data recovery, then get started with a hex editor.
“Yes, I would like to try such a hex editor!”
Before reading on, we must warn you that changing file clusters with a hex editor can result in permanent data loss. If you still want to try it, use a hard disk or USB stick that you wanted to put away.
We do not recommend trying to recover deleted files yourself this way, as there are many other factors that can affect the final result. You should see this blog post more as an educational text than as a practical guide.
Have you lost data and do you need help? Feel free to contact one of our data recovery experts. That said, we can now get started.
If you want to try to retrieve deleted files from NTFS drive yourself, you need:
- The disk with deleted data. This must be a disk with data you can miss. We recommend using a USB stick with one erased file;
- A PC to perform file recovery on;
- A hex editor (we recommend WinHex);
- A second storage device to store recovered data;
- A second storage device to store recovered data;
- The name of the deleted file.
Connect both storage devices to your PC, fire up the hex editor and you are good to go.
“How does a data recovery with a hex editor work?”
Data recovery using a hex editor goes in three steps:
- Scan the storage device to identify the deleted files or data;
- Identify the cluster (s) of the searched deleted file;
- Restore the cluster (s) with the deleted file.
It is important to know that not every file can be recovered. If the clusters with your deleted files are overwritten, your files are almost certainly gone forever. Therefore, in case of data loss, we always recommend that you immediately stop using the affected storage device, because any activity after the data loss may cause the clusters to be overwritten.
1 Scan the NTFS volume
On the NTFS drive, use the search function of your hex editor to search for the file name of the deleted file. In this example, we search for “My Presentation.ppt”, the file name of a PowerPoint presentation. The hex editor shows the following:
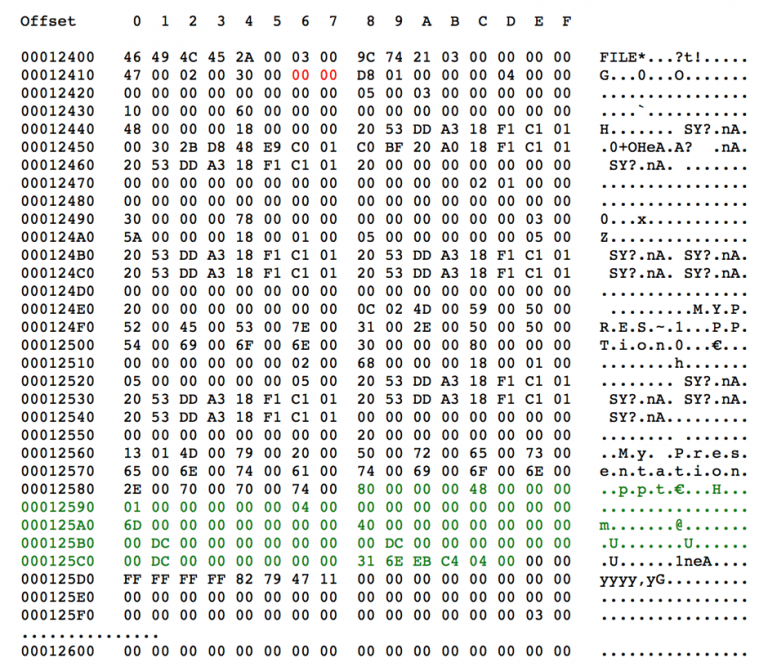
In the right column you can format the file name: M.y..P.r.e.s.e.n.t.a.t.i.o.n… p.p.t. €.
Among the many details you will see after a search, there is a specification called “Flags”: the red marked numbers behind the twenty-second byte of the file record header. If the field is set to “1”, the file is in use and not deleted. In our example, the field is set to “0”, which means that the My Presentation.ppt file has actually been deleted.
The search also provides values for “Cluster size”, “Compression Unit Size”, “Allocated size of the attribute”, “Real size of the attribute” and “Data runs”. Record these values; you need them for step 2 of the data recovery.
2. Identify clusters
You need to rescan the storage medium for the next step: going through all the file clusters until you find the file size that matches the selected clusters. The NTFS file system gives each file an _DATA_ attribute indicating the “data runs”, which in turn indicate the location of the file clusters to be restored.
Before continuing, you must decipher the “data runs”. Check out the following excerpt from the hex editor:
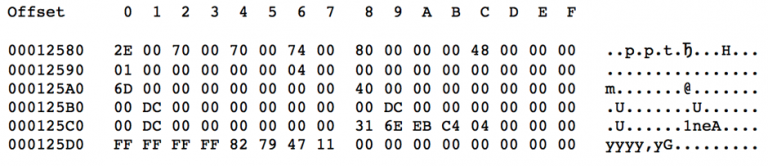
Here’s where things get trickier:
- The first byte (0x31) indicates how many bytes indicate the length of the data run, in this example 0x1, and the first cluster offset indicates: 0x3;
- The next byte, 0x6E, represents the length of the data run;
- The following three bytes represent the initial cluster offset: 0xEBC404;
- By changing the order of the bytes you can find out that the first cluster is 312555 (or 0x04C4EB in hexadecimal);
- By applying the length of the data run as found above, we discover that the following 110 clusters (0x6E) contain our PowerPoint presentation.
We know this is correct because the next byte is 0x00, which means that no further data runs exist.
3. Restore clusters
Now that we have found the clusters, all that remains is to copy the deleted data to another storage medium. Using the location of the first cluster, found in step 2 (312555), you simply copy the 110 subsequent clusters, but first of all you need to calculate the offset of the first cluster.
This is done by multiplying the cluster size (512) by the location of the first cluster:
512 * 31255 = 160028160
The result must then be converted to hex so that you get the offset marking where your deleted file starts = 0x0989D600
You then copy the 110 clusters behind it (512 * 110 = 56320 bytes) to the other storage medium and voilà, you have now recovered the deleted file from the NTFS partition.
“Was it worth it?”
Although it is possible, data recovery takes a lot of time in this way and there is also the chance that more data will be lost. As we said before, there are many factors that can make a data recovery succeed or fail. You should therefore see this post as purely educational. It is better to use reliable, reliable data recovery software that does this for you or a data recovery service that takes all your worries off your hands.
This blog also shows what kind of puzzle work our data recovery engineers have to do with more complex software damage, for example with virtual systems, whether or not caused by physical damage or for “impossible” cases where no software or tooling exists yet.
This blog post originated from the blog of our partner Ontrack, written by Jaap-Jan Visser. For questions regarding recovery options for your data, please feel free to contact the consultants of PSG Forensics, recognized partner of Ontrack.
The original publication can be found here:
https://www.ontrack.com/nl-nl/blog/how-to-recover-your-own-data-without-data-recovery-software/